Thursday, November 24, 2011

Blue Ribbon Apple Pie

Happy Thanksgiving!


I sure hope that you are able to spend the day enjoying family, friends and food!
Our little family will be getting together with all of my husband's relatives at his grandma's house.  Usually grandma does all of the cooking, but this year I decided to contribute to the feast by bringing a pie for dessert.


Now, I attempted to make a pie from scratch a few years ago... and got terribly frustrated.  The crust dough was crumbly and not rolling out right and the end result was a lopsided mess!  At that point I resolved to only use pre-made crust in the future.


And then I stumbled across this:  

Grandma Brunet's Blue Ribbon Apple Pie


Hmm... I thought to myself... that doesn't look too hard...  wow... that recipe is absurdly simple...


Crust:
2 cups flour
1 teaspoon salt
1 cup shortening
1/4 cup cold water


Filling:
3/4 cup sugar
1 teaspoon cinnamon
2 tablespoons flour
6-8 medium sized tart apples, thinly sliced


How hard could it be?  


Truth is, it wasn't!  An hour and a half later we were enjoying some of the most delicious apple pie I've ever tasted!  The crust was light and flaky and the apple filling was sweet and juicy!  Since I found the recipe three weeks ago I've made just as many pies and they have all turned out great.


This one will be coming with us to grandma's house!  I can't wait to share it!


...and I had enough dough left over to make two little mini pies!  
(These I don't have to share!)


The recipe and step by step instructions can be found here.


Saturday, November 12, 2011

Baby Squid!

Last year I created a life-sized giant squid for my sister for Christmas.  It was 8 feet long and yes, it was green.


Well, the squid had a baby...


...in a matter of speaking.

Here is the birth story:

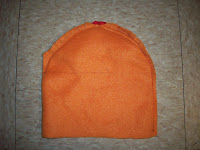
It all started with a couple pieces of fleece.


I divided the length into 8 triangular sections for the tentacles and roughly cut them out.


After pinning the fleece pieces together I sewed along the edges of the tentacles.  Since I made the inner (red) triangles smaller than the outer (orange) ones the tentacles a bit of natural curl to them.


After folding the outer (orange) panel down, I folded the whole thing in half by matching up the outer (orange) side edges and the inner (red) side edges.  I marked up a semi-circle on the inner (red) panel and then sewed around the edge of the semi-circle and down the outer (orange) side.  After trimming around the semi-circle I folded up the outer (orange) panel and turned the tentacles right-side out.  


Then came the eyes.  I embroidered the black center of the eye onto a circle and then sewed a strip of fleece into a loop with the same circumference as the circle.  This strip was then sewn around the circle's edge.  A little stuffing and then the eyes were sewn onto the body.


It's starting to look cute, huh?


For the top of the squid I drew a semi-circle onto a piece of folded fleece.  I also made some small triangles.  I sewed up two of the triangles' sides and then flipped them right-side out.


The triangles were then sandwiched within the fleece of the squid top with the open side facing outward.  I then sewed along the semi-circle, clipped the curve and flipped it right side out.


The squid top was then stuffed and pinned onto the squid body and sewn in place.  I didn't sew directly on the fold itself; rather, I folded the edge of the squid top down about an inch or so and sewed there.  This made a little "flap" where the squid top and body met.


For the large, long tentacles I folded long strips of fleece in half lengthwise and sewed up the side, leaving length at the top where I trimmed out a point.  After turning the long strips right-side out I sandwiched a leaf-shaped piece of fleece between the pointed ends and sewed it in place.


All that was left was to tack the long tentacles onto the underside of the squid.


Voila! A baby squid was born!


...a baby squid that also makes a fun baby "hat!"

Tuesday, November 8, 2011

Look what I "MADE!"

After having so much fun making some raglan shirts for little Buddy, I decided to try the "90 Minute Shirt" by Dana over on "MADE."  I have to say, her tutorials are A-Maze-Ing!  Not only are they super clear and easy-to-follow, but they are bright and colorful.  Her blog is full of great ideas and fun, crafty stuff!

Anywho, here is the shirt:


Complete with coordinating pants!


I think it turned out pretty sweet.  :)