Tuesday, December 13, 2011

Christmas Mice!

'Tis the season to bake cookies!

LOTS of cookies.

Of course everyone has a favorite kind of Christmas cookie... and mine are mice!


My family has been making mice cookies for Christmas ever since I can remember.  Baking them has become a tradition.  I love making them for cookie exchanges and gifts because besides tasting oh so yummy, they are also so adorably cute!

Here's how to make your own:

Start by mixing together
1 cup of soft margarine and
1 cup of brown sugar until it's all nice and creamy.

Then add
1 egg
1 teaspoon of almond extract and
2 teaspoons of vanilla.

Once that is all nicely mixed, gradually beat in
3 1/2 cups of flour until you have a nice, stiff dough.

Refrigerate the dough for at least 2 hours.
During this time you can gather the "accessory" ingredients which include currants (for the eyes), sliced almonds or peanut halves (for the ears) and long, skinny lace licorice whips (for the tails).

Alright, now that you have some chilly dough, it's time to make mice!
Form the dough into 1" balls (about a tablespoon worth of dough works nicely) and then pinch the sides to form little tear-drop shapes.


You'll want to leave a generous amount of space between the rows of mice on the cookie sheet for when we put the tails in after baking.  Okay, now for the fun part!  Using the currants for eyes and the almonds (or peanuts) as ears, give your mice cute little faces!


Awww...aren't they cute?  Now go ahead and bake them in an oven preheated to 325 degrees for 9-12 minutes.  Now is a good time to cut your licorice lace into 3" pieces for tails.


When you take your mice out of the oven they will still be a little squishy but they will also be very lightly brown on the bottom.  Once they are out of the oven, quickly poke their licorice tails into them before they stiffen up.


Ta Da!  Once they have cooled, enjoy their tasty goodness!  Although they are almost too cute to eat...

This is a great holiday cookie for kids to help make, too!  Just be aware that mutations sometimes happen...


Merry Christmas!


Thursday, November 24, 2011

Blue Ribbon Apple Pie

Happy Thanksgiving!


I sure hope that you are able to spend the day enjoying family, friends and food!
Our little family will be getting together with all of my husband's relatives at his grandma's house.  Usually grandma does all of the cooking, but this year I decided to contribute to the feast by bringing a pie for dessert.


Now, I attempted to make a pie from scratch a few years ago... and got terribly frustrated.  The crust dough was crumbly and not rolling out right and the end result was a lopsided mess!  At that point I resolved to only use pre-made crust in the future.


And then I stumbled across this:  

Grandma Brunet's Blue Ribbon Apple Pie


Hmm... I thought to myself... that doesn't look too hard...  wow... that recipe is absurdly simple...


Crust:
2 cups flour
1 teaspoon salt
1 cup shortening
1/4 cup cold water


Filling:
3/4 cup sugar
1 teaspoon cinnamon
2 tablespoons flour
6-8 medium sized tart apples, thinly sliced


How hard could it be?  


Truth is, it wasn't!  An hour and a half later we were enjoying some of the most delicious apple pie I've ever tasted!  The crust was light and flaky and the apple filling was sweet and juicy!  Since I found the recipe three weeks ago I've made just as many pies and they have all turned out great.


This one will be coming with us to grandma's house!  I can't wait to share it!


...and I had enough dough left over to make two little mini pies!  
(These I don't have to share!)


The recipe and step by step instructions can be found here.


Saturday, November 12, 2011

Baby Squid!

Last year I created a life-sized giant squid for my sister for Christmas.  It was 8 feet long and yes, it was green.


Well, the squid had a baby...


...in a matter of speaking.

Here is the birth story:

It all started with a couple pieces of fleece.


I divided the length into 8 triangular sections for the tentacles and roughly cut them out.


After pinning the fleece pieces together I sewed along the edges of the tentacles.  Since I made the inner (red) triangles smaller than the outer (orange) ones the tentacles a bit of natural curl to them.


After folding the outer (orange) panel down, I folded the whole thing in half by matching up the outer (orange) side edges and the inner (red) side edges.  I marked up a semi-circle on the inner (red) panel and then sewed around the edge of the semi-circle and down the outer (orange) side.  After trimming around the semi-circle I folded up the outer (orange) panel and turned the tentacles right-side out.  


Then came the eyes.  I embroidered the black center of the eye onto a circle and then sewed a strip of fleece into a loop with the same circumference as the circle.  This strip was then sewn around the circle's edge.  A little stuffing and then the eyes were sewn onto the body.


It's starting to look cute, huh?


For the top of the squid I drew a semi-circle onto a piece of folded fleece.  I also made some small triangles.  I sewed up two of the triangles' sides and then flipped them right-side out.


The triangles were then sandwiched within the fleece of the squid top with the open side facing outward.  I then sewed along the semi-circle, clipped the curve and flipped it right side out.


The squid top was then stuffed and pinned onto the squid body and sewn in place.  I didn't sew directly on the fold itself; rather, I folded the edge of the squid top down about an inch or so and sewed there.  This made a little "flap" where the squid top and body met.


For the large, long tentacles I folded long strips of fleece in half lengthwise and sewed up the side, leaving length at the top where I trimmed out a point.  After turning the long strips right-side out I sandwiched a leaf-shaped piece of fleece between the pointed ends and sewed it in place.


All that was left was to tack the long tentacles onto the underside of the squid.


Voila! A baby squid was born!


...a baby squid that also makes a fun baby "hat!"

Tuesday, November 8, 2011

Look what I "MADE!"

After having so much fun making some raglan shirts for little Buddy, I decided to try the "90 Minute Shirt" by Dana over on "MADE."  I have to say, her tutorials are A-Maze-Ing!  Not only are they super clear and easy-to-follow, but they are bright and colorful.  Her blog is full of great ideas and fun, crafty stuff!

Anywho, here is the shirt:


Complete with coordinating pants!


I think it turned out pretty sweet.  :)

Tuesday, October 25, 2011

Raglan Shirt Tutorial

Now that we've made our patterns, it's time to start sewing our shirts!

The first step is to lay out your pattern pieces on your material.  Thrifty chick that I am, I decided to use some old shirts that I had laying around.  Buddy was very excited and wanted to help!


Since I needed to cut out two of each pattern piece (a front and a back and two sleeves) and since each piece needed to be placed on a fold, I simply folded over the shirts and pinned my patterns on the edges.  


Since I used old shirts I was able to line up the bottom edges of the pattern pieces with the already finished edges of the shirts.  This way I was able to save myself the trouble of hemming the shirt and cuffing the sleeves later on.  If you also choose to do this, just remember to subtract whatever seam allowance you had added to the pattern pieces for the bottom shirt edge and the sleeve cuffs... otherwise you'll have a long shirt with sleeves that are too long!  A simple and temporary way to subtract the seam allowance is to fold the edge of the pattern piece.  

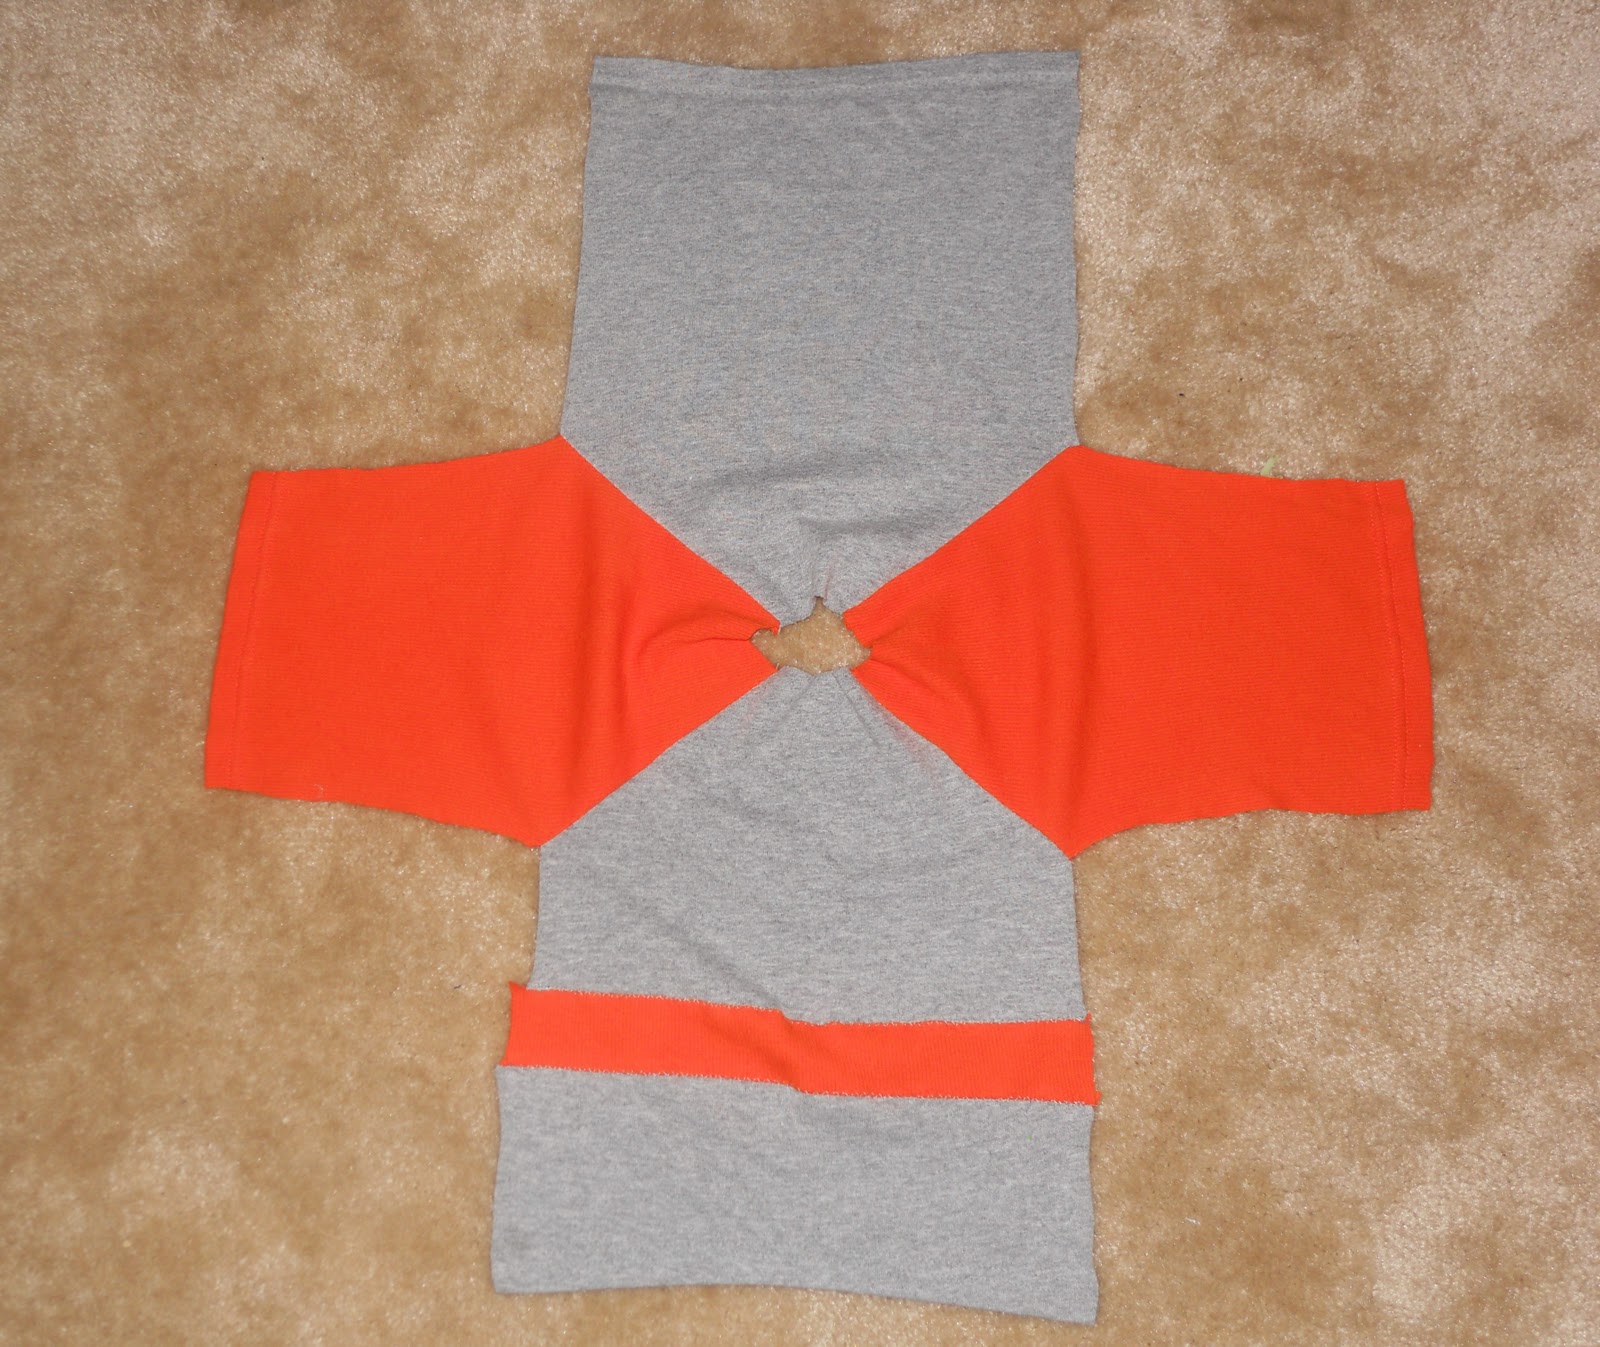
Alright, everybody got your pieces cut out?  You should have a back, and front, and two sleeves.  Now is a good time to add a design or applique to your shirt while the pieces are flat.  I added an orange stripe to the font of this shirt just for fun.


Now lay your sleeves upside-down on top of the front of your shirt.  The "right" sides of the sleeves and front should be facing each other.  Pin along the shoulder edge and then sew.  Now is probably a good time to mention that when machine sewing with "knit" fabrics such as T-shirt material you will want to use a needle designed for knit fabrics.  Normal machine needles have a tendency to slice through fabric threads... which causes runs and unsightly unraveling in knit materials.


Once you finish sewing the sleeves to the front of the shirt, sew the back of the shirt on in the same way.  You should end up with a cross-shaped looking garment with all of the "right" sides facing up and all of the "wrong" sides underneath.


And now for the one tricky part:  sewing on the collar!  It took me a couple tries to get this right, so be patient with yourself too.

First you need to determine the circumference of the collar.  One way to do this is to measure around the opening for the collar that was created when you sewed the sleeves onto the front and back of the shirt.  It is also a good idea to measure the head of whomever will be wearing this shirt to make sure that they will be able to get their head through the collar.  (One of the first shirts I made Buddy had this problem!  I couldn't get it over his head!)

Perhaps the best material for collar-making is "ribbing."  Although you could use regular T-shirt material, ribbing has a bit more stretch to it and lays a little nicer.  The orange tank top that I cut up for this shirt was made of ribbing, so I was in luck!

Once you determine the circumference of the collar, add two seam allowances (for example, if you use 3/8" seam allowances, add 3/4") and cut that from a two or three inch wide strip of material.  


Sew the strip into a loop and then fold and press it in half lengthwise.  


Now with the right sides of your shirt facing up, pin the folded strip around the collar opening with the open edge towards the center.


Go ahead and sew around the collar.  It is helpful to use at least a 1/2" seam allowance here.  (You'll see why in a minute!)   Also, I found that using a slightly larger stitch length and a looser tension on my machine kept the collar from getting all stretched out as I sewed it.


Once it's sewn, you're going to flip the open edge of the collar underneath the shirt so that the folded edge is now towards the center.  To keep the collar in place and to keep that open edge tucked away, sew around the shirt just below the collar.  If you gave yourself at least a 1/2" seam allowance, it will be easier to secure that open edge!


Alright, the collar is sewn in!  Whew!  

Now fold the shirt inside out and pin up the sides of the shirt and the bottoms of the sleeves.  Go ahead and sew them up!


After sewing up the sides, make a tiny snip at the armpit almost to the seam.  Believe it or not, this little snip is the difference between a nice-looking flat armpit seam and a wonky, bunched-up armpit seam.


Because I used old T-shirts with existing hems I didn't have to finish the bottom of my shirt or cuff the sleeves.  Otherwise, that would be your last step.

Finally, turn your creation right-side out and enjoy!


Buddy certainly enjoys his!


Tuesday, October 18, 2011

Raglan Shirt Pattern


That's right!  It's time for me to show you how to make a simple and versatile shirt pattern!  All you need is a shirt that already fits--and don't worry, you don't have to cut it up!  It doesn't matter what kind of sleeves the shirt originally has, but this pattern will be for a shirt with raglan-style sleeves like this one:


Step One:  Simply fold your shirt in half and place it on a large piece of paper like so:


You may want to iron it or turn the shirt inside-out so that it lays as flat as possible.  

Step Two:  Trace the outline of your shirt:


Step Three:  Draw a line (approximately 45 degrees) from the armpit of the shirt to somewhere on the neckline.


Step Four:  Add seam allowances to the sleeve section.  Add to the bottom of the sleeve and on the opposite side of the 45 degree line.  I like to use small seams like 3/8" but you can use whatever you're used to.  You'll want to add at least an inch to the cuff of the sleeve so that you can fold it over and hem it.  Don't bother adding any seam allowance to the neckline or the top of the sleeve.


Step Five:  Add seam allowances to the body section, just like you did before.  Again, you'll want at least an inch on the bottom of the shirt for hemming purposes.  Also, since my little guy has such a long torso I added a bit more on the bottom to make the shirt longer.


Step Six:  Trace!  Using another piece of paper, trace your pattern pieces, including the seam allowances.  It is then helpful to label the pieces and label which edges will be placed on folds when you cut the pieces out of fabric.  Since we folded the original shirt in half when we drew the pattern, that folded edge should be marked "fold" as should the top of the sleeve section.


You can also mark a front neckline on the body section if you'd like.  Having the neckline an inch or so lower in the front usually makes a shirt more comfortable.

Now that you have your pattern ready, it's time to sew!  Onto the Raglan Shirt Sewing Tutorial we go!